Steps to Activate Microhost VPN

Steps to Activate Microhost VPN

virtual private network (VPN) gives you online privacy and anonymity by creating a private network from a public internet connection. VPNs mask your internet protocol (IP) address so your online actions are virtually untraceable.

1. At first, Access Microhost cloud platform

2. Now click on VPN option and Create VPN

3. Select DC Location and Enter VPN name, number of users, billing cycle after that click on Deploy

4. Once you click on deploy VPN it will redirect you to the payment page. After the payment, VPN would be created and ready to use. Now click on Manage VPN option from action section. 

5. Now from Add user section you can create vpn user. 

6. After adding users you can see user details from the manage user section and download the ovpn file after clicking on download option. 

7. Now you need to download the open vpn client connect 

a) For windows https://openvpn.net/downloads/openvpn-connect-v3-windows.msi

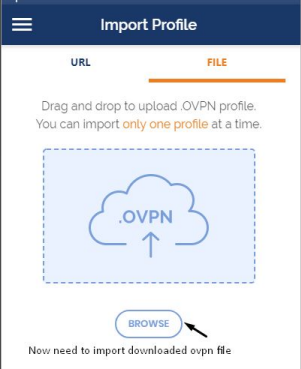
8. After downloading and installing, you can see the openvpn shortcut on your desktop. run openvpn client, it will ask for the URL import and file import option, You need to select the file import option and import ovpn file which you downloaded.

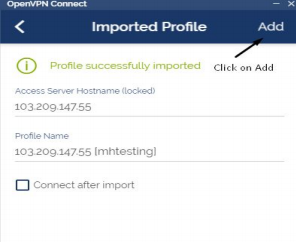
9. After importing the ovpn file, you will see the message “profile imported successfully”. you have to add a profile and connect vpn.

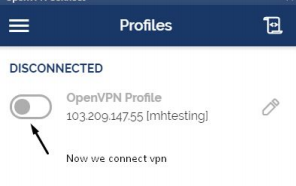
10. Once you import and add profile. You will be able to see the connect option.

Thank you.

    • Related Articles

    • Steps For Microhost WHMCS Module Setup

      1. Please download the Microhost WHMCS module from here and extract the file after that upload on the hosting server by using ftp in whmcs root directory. Now login to WHMCS with admin privileges after that click on the addon module in the setup ...
    • Steps to deploy Tally on Microhost Cloud

      1. Access URL https://www.microhost.com/tallycloud and enter your details, your name, email and password for microhost cloud platform access.   2. Once you fill your name, email id and password, click on create tally server. 3. It will redirect you ...
    • Microhost Cloud Dashboard

      Introduction:  Microhost is the first cloud infrastructure provider in INDIA, which delivers different kind of cloud products. We are going to explain all the product and feature individually. So let’s get started.      While login into Microhost ...
    • How to Rebuild Microhost Cloud Server

      Rebuilding a server means creating a server with clean OS installation and it will erase all current data from server. It is just like formating a server with same configuration. Please Use this feature only if you want to start your cloud ...
    • How to add additional storage in the Microhost Cloud Server

      Login to Microhost Cloud Dashboard Select the cloud server in which you want to add additional storage and then click on “Actions” button. 3. When you click on “Manage cloud” option , A window will appear shown in the image below. You need to select ...